
Ever wondered how those jaw-dropping bullet-time ad videos are made? You know the ones: someone bumps into another, drinks and glasses fly, time freezes, and the camera swoops through a lens to reveal a product. Traditionally, these are a nightmare to stitch together from multiple clips. But what if you could create that entire cinematic sequence in a single AI generation? ✨
With Luma AI's Seedance 2.5, you absolutely can. This isn't just about making cool videos; it's about mastering a powerful tool to produce high-quality, complex ad content with unprecedented control. We're going to break down the exact method, from concept to export, so you can build your own viral ad, starring your brand, all from one prompt.
Advertisement
Why Seedance 2.5 Changes the Game for Creators 🚀
Luma's Seedance 2.5 is a game-changer for anyone serious about AI video. It now generates native 30-second videos in one go, completely eliminating the need for tedious stitching. This means no more visual inconsistencies or awkward transitions that scream 'AI generated.' You get a seamless, fluid output that feels professionally produced.
This extended native generation capability, combined with enhanced control features, means your prompt engineering skills are more crucial than ever. You're not just asking for a video; you're directing a mini-movie with a level of precision previously unimaginable in AI tools. Think of it as having a virtual film crew at your fingertips, ready to execute your vision down to the millisecond. This is a huge leap for automated content creation, especially for ads and marketing where every second counts.
Deconstructing the Viral Bullet-Time Ad 🔍
Before you even think about writing a prompt, you need to become a detective. The viral bullet-time ads you see online often *look* like one seamless shot, but they're usually stitched together from many short clips. Your goal is to beat that, creating a truly continuous sequence.
Grab a reference video and break it down. What are the distinct 'beats' – the walk, the impact, the slow-motion freeze, the object macros, the product reveal? How long is each? Crucially, where are the *actual* cuts? You'll often find hard transitions every few seconds, revealing the multi-clip truth. Also, pay close attention to branding. Smart creators laser-etch their handles onto sunglasses or other objects, turning branding into product design, not just a watermark. This pre-analysis helps you understand the skeleton of the ad you're about to build and how to make yours superior.
Building Your Visual Foundation: Pinterest & Character Sheets 🎨
Every great film starts with a strong visual concept. Before you even touch Seedance 2.5, head to Pinterest. This is where you'll define the look and feel of your ad, ensuring consistency and a polished aesthetic.
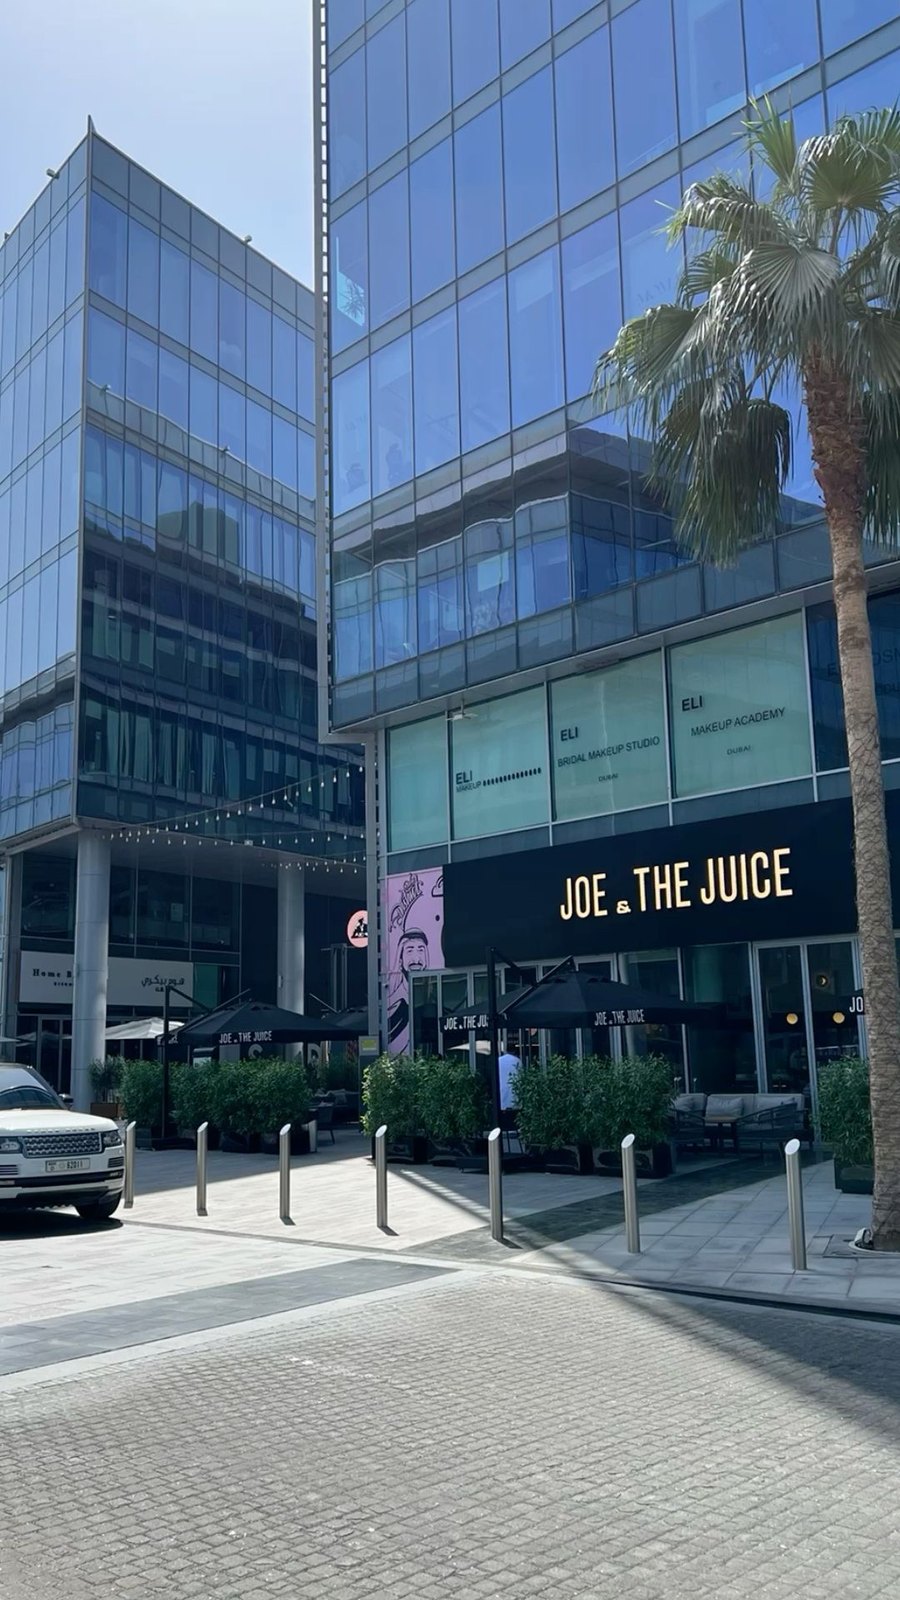
You're looking for two key things: the perfect location and a distinctive outfit. For location, search for the vibe you want – a sun-drenched European street, a bustling city square, a rainy alley. Pick one real photograph with strong architecture and clear depth (something close, mid, and far). Don't worry about the lighting; you'll control that in your prompt. For outfits, focus on strong silhouettes and a dominant accent color. These elements will be crucial for your character's visual impact, especially in motion.
Next, create a character sheet. This is a critical step many skip, leading to character drift. Use an image model like ChatGPT to generate a single landscape sheet from a clear photo of your face. This sheet should include a close-up, four full-body turnarounds, a color palette, and accessories. This single image becomes your consistent character reference throughout your video prompt, ensuring your subject stays true to form. A masked or heavily styled character is easier to keep consistent, but you'll sacrifice facial acting – a trade-off to consider early.

A character sheet ensures your subject remains consistent throughout your AI-generated bullet-time ad.
Crafting Your References: Advertising with Purpose 🎯
In Seedance 2.5, every reference you use has a job. Understanding these roles transforms your video from a cool clip into an effective advertisement. You'll be using your character sheet, your chosen environment photo, and crucially, your hero objects.
Your character sheet (uploaded as @PERSON) ensures your subject's consistency. Your environment photo (uploaded as @ENVIRONMENT) sets the scene, providing architectural and geographical details. But the real stars are your hero objects. These aren't just props; they get their own full-screen moments, often making up a significant portion of your ad's runtime.
Choose your hero objects deliberately:
- One WORN item: Think glasses, a watch, headphones. This is where your logo goes, and it's the perfect item for the camera to pass *through* for a dynamic transition.
- One item with a READABLE FACE: A phone screen, a smartwatch. These are narrative goldmines. You can display a message, a call to action, or even a 'live call' to explain why your character was distracted.
- One item that CARRIES THE PRODUCT: This is the reason for the ad. Everything else builds up to this reveal. Ensure it's visually compelling and positioned for a strong macro shot.
Advertisement
The Prompt: Your Script for AI Filmmaking ✍️
This is where the magic happens. Seedance 2.5's prompting structure allows for incredible detail and temporal control. The recommended formula is: Subject + Action or Event + Scene and Environment + Visual Style + Camera Movement/Cut + Audio. You'll build your prompt from macro to micro, ensuring every element is accounted for.
A key technique is using timestamps for precise control. You can dictate exactly when actions occur, camera angles shift, dialogue starts, sounds play, and scenes transition. This is how you achieve that perfect bullet-time freeze and the seamless camera movement through an object. For example, to achieve the iconic camera glide through sunglasses, you'd specify a beat like: '7.5-10.0s: camera glides forward and passes THROUGH the tinted sunglasses lens, the world warms to amber for a beat as the frame rim sweeps past, then racks focus onto the product.' This level of detail is what makes your ad truly cinematic and unique.
Seedance 2.5 also supports direct text rendering within videos. This is invaluable for ads, allowing you to include slogans, product names, or calls to action directly in the scene, with control over their appearance and timing. This reduces post-production work and ensures your message is integrated seamlessly.

Detailed prompting with timestamps is your key to unlocking Seedance 2.5's full potential for complex video sequences.
Mastering the Freeze: Zero Velocity, Not Slow Motion 🧊
The most common failure in AI-generated bullet-time is a 'mushy' slow-motion effect instead of a true freeze. When you ask a model to 'slow down dramatically,' it often gives you continuous, albeit slow, movement. This reads as a video playing at 20% speed, not time stopping. A real freeze has specific properties that you must explicitly prompt for.
First, velocity must be absolute zero. Your prompt needs to state 'absolute zero,' 'a total stop,' and 'not slow motion' in multiple ways to ensure the model understands. Second, the pose must be identical at the start and end of the frozen beat. This gives you a testable outcome. Third, only the camera moves; everything else is anchored in world space. And don't forget: NO ROTATION. If you don't forbid rotation, your branded object might slowly turn away from the camera just as it's meant to be highlighted. These explicit instructions are crucial for a convincing, high-impact freeze.
QA and Post-Production: Polishing Your Masterpiece ✨
Generating your video is just the beginning. Watching it at full speed won't reveal subtle flaws. You need a rigorous Quality Assurance (QA) pass, frame by frame, to catch the five common failure modes that are invisible at 24 frames per second.
Start by pulling one frame per second to create a contact sheet. This confirms your beat structure. Then, go dense on problem areas: pull frames every 0.2 seconds across the walk, impact, and landing to spot shuffling gaits or unnatural movements. Verify your freeze by comparing the first and last frames of each frozen beat – did anything move or rotate? Check subject presence during impact sequences, ensuring the character is always in frame. Finally, inspect your branding at 100% resolution to confirm your logo rendered crisply.
For post-production, remember that AI models excel at rendering light and glass, but often struggle with text. Let the model handle the specular sweeps and lens pass-throughs – those are hard to fake. But for typography, do it yourself! Create your wordmark as a transparent PNG, sample colors directly from your render for perfect matching, and add a subtle dark offset for realism. This hybrid approach ensures a professional, high-quality finish for your bullet-time ad.
Complete step-by-step walkthrough
Original TECH4SSD tutorial and reference media
Tools
- Pinterest (reference sourcing)
- ChatGPT or any image model (character sheet)
- Luma / Dream Machine running Seedance 2.5 (video)
- CapCut or After Effects (post)
- ffmpeg (QA)
Before you begin
- A clear photo of your own face, ideally front-on with even lighting
- Access to an image model that accepts a photo reference (ChatGPT, Nano Banana, Midjourney)
- Access to a video model that takes multiple named reference images
- Product shots of the two or three objects you want to feature
- Basic familiarity with a video editor for the final branding pass
Watch the original Instagram tutorial
Open the approved tutorial video
1. Study the reference before you write a single word
Everyone starts by writing a prompt. Start by counting instead. Download the viral video you're referencing and step through it. You are looking for three things: 1. THE BEAT COUNT. How many distinct moments are there, and how long is each? Most of these ads contain the same skeleton: walk, hero reveal, impact, the slow-motion break, one hero object beat, and a product hold. 2. WHERE THE CUTS ARE. This is the part nobody checks. Take the difference between consecutive frames. Where the difference spikes, there's a cut. Run this on almost any viral 'one-take' bullet-time ad and you'll find hard transitions every two to four seconds, because it was generated as eight separate clips and edited together. 3. WHAT'S ON THE OBJECTS. Pause on each frozen macro. On the original that started this trend, the creator's handle is laser-etched onto the sunglasses temple arm. That is full-screen branding that reads as product design rather than a watermark. It is the single smartest thing in the video. Why this matters: once you know the reference is stitched, you know you can beat it. A model that generates the whole thing in one pass gives you something the original creator could not have, a genuine unbroken take, which is far more cinematic than eight clips buttoned together.
Code
# Where are the cuts? Spike = cut.
ffmpeg -i reference.mp4 -vf "select='gt(scene,0.3)',showinfo" -f null - 2>&1 | grep showinfo

# Pull one frame per second to count beats
ffmpeg -i reference.mp4 -vf fps=1 frames/f_%03d.png
Tip: If the reference has a hard transition every 2-4 seconds, it is not a one-take. You are allowed to say so, and you are allowed to do better.
- Beat list written out with timestamps
- Cut positions identified
- Noted what branding appears on which object
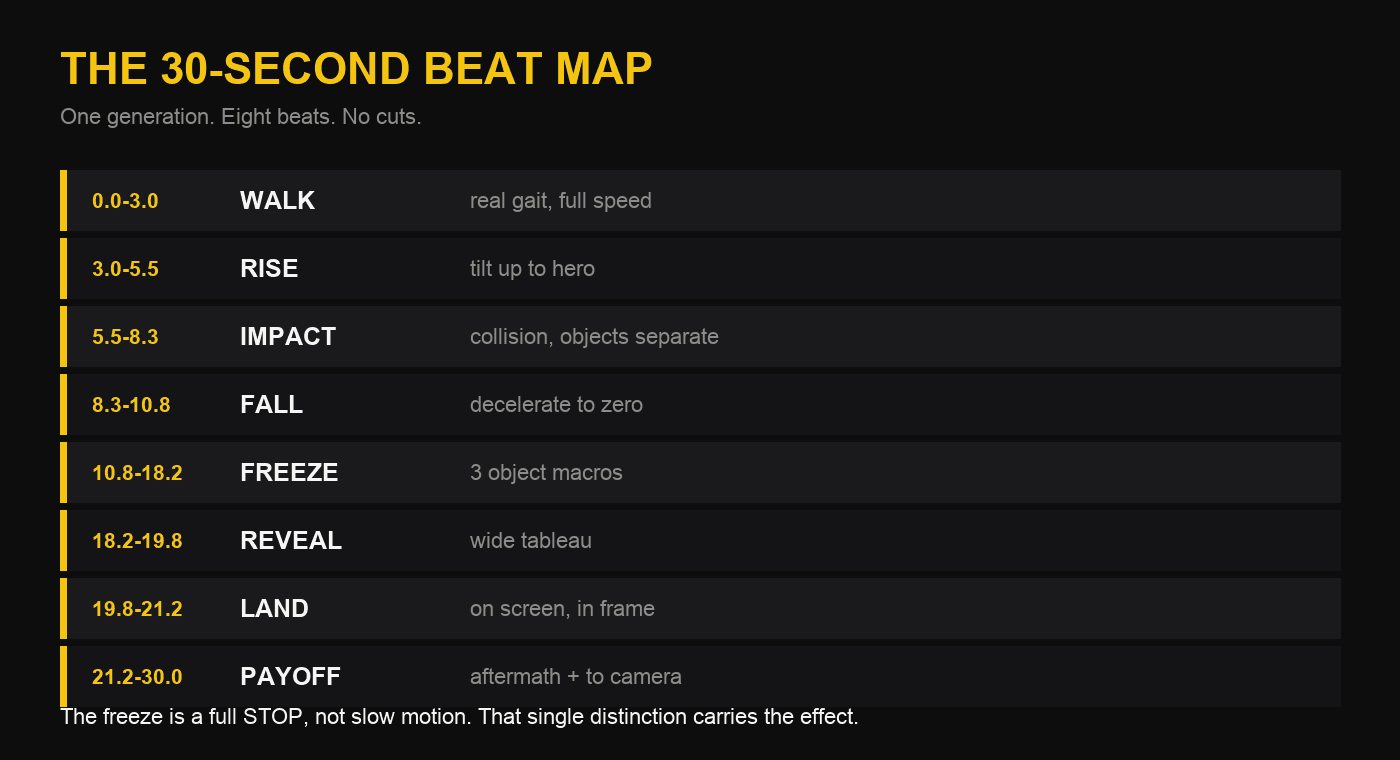
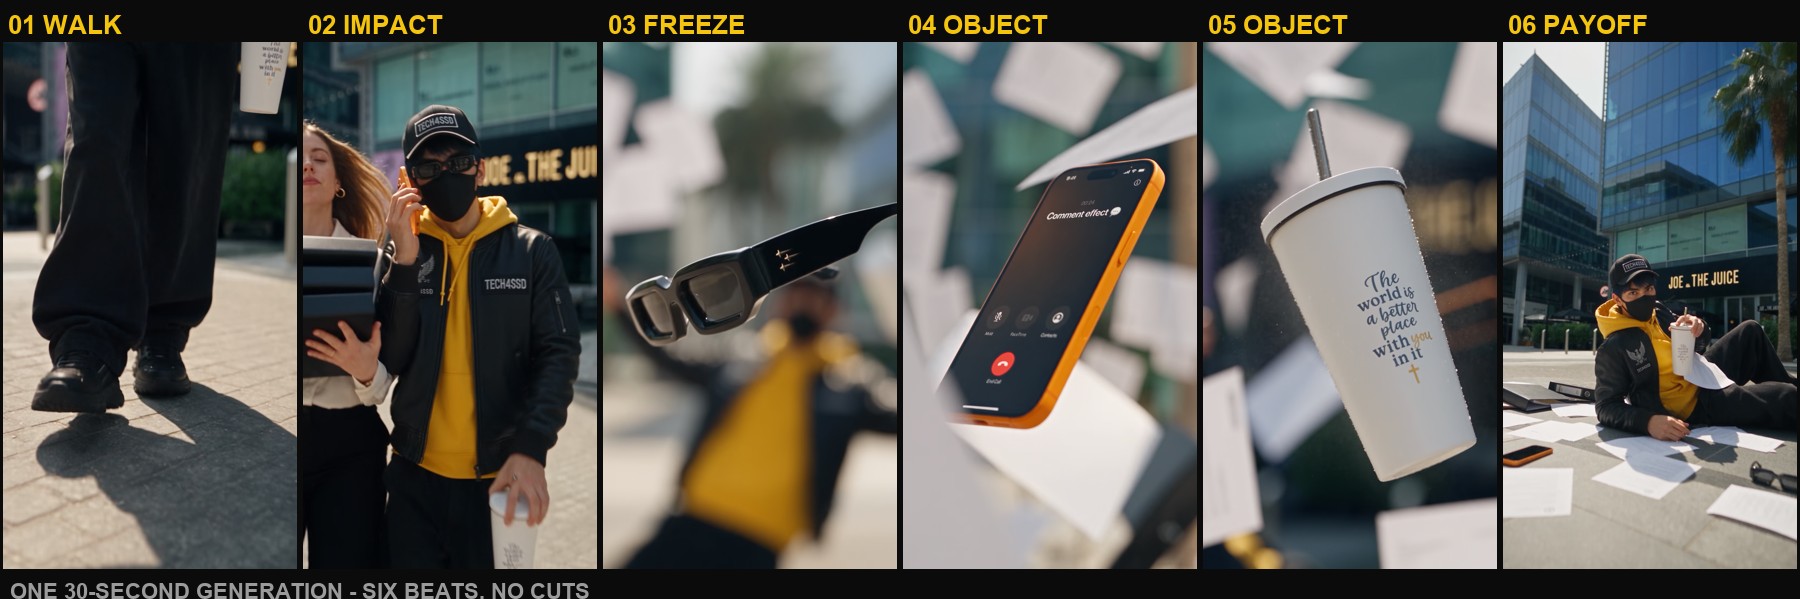
2. Build your look board on Pinterest first
Before any AI touches this, decide what the film actually looks like. Pinterest is the fastest tool for that, and it costs you ten minutes. You are collecting two things, and only two. THE LOCATION. Search for the kind of street you want to shoot on: a sunlit European boulevard with pastel facades, a glass-tower plaza, a rainy Tokyo alley. Save five or six, then pick the ONE with the strongest architecture and the clearest ground surface. You want a real photograph, not a render, and you want depth in it, something close, something mid, something far. That depth is what sells the wide moment later. Don't worry about the light in your reference photo. You will relight the whole scene in the prompt. A location shot in flat midday sun can be turned into golden hour with one paragraph. What you cannot change is the geometry. THE OUTFIT. Search for the silhouette you want your character to wear. Streetwear, tailoring, workwear, whatever fits your brand. Look for outfits with strong shape and one dominant accent colour, because in a film shot mostly in motion, the silhouette and the colour are the only things a viewer actually registers. One piece of advice that will save you a generation: pick an outfit with a distinctive top layer and a bold accent colour. That accent becomes the only saturated thing in your grade, and it makes your character readable even in the middle of a liquid explosion. Save both boards. You will feed the outfit to your image model in the next step, and the location straight into the video prompt.
Tip: Pick a location with real depth, something near, something middle, something far. Flat backdrops collapse in the wide moment and the effect loses all its scale.
- One location photo chosen, real photograph, strong architecture, visible ground surface
- Outfit reference chosen with a clear silhouette
- One dominant accent colour identified, with its hex code
- Both saved somewhere you can find them in ten minutes
3. Turn your own photo into a character sheet
This is the step most people skip, and it is the reason their videos fall apart halfway through. The subject quietly changes. Different shirt, different face, different shoes. Drift is guaranteed unless you pin it down first. The fix is a character sheet: one image containing your character from four angles plus every detail that defines them. You build it once and reuse it forever. HOW TO MAKE ONE. Open ChatGPT (or any image model that accepts a photo reference). Attach a clear photo of your own face, front-on with even lighting, and paste the prompt below. Fill in the brackets with the outfit you chose on Pinterest and your brand colours. WHAT YOU GET BACK is a single landscape sheet like the one shown here: a close-up portrait, four full-body turnarounds, a colour palette with hex codes, your accessories shot on black, and a strip of detail crops. That one image becomes your character reference in the video prompt. A NOTE ON FACES. A masked, hooded or heavily-styled character is dramatically easier to keep consistent than a bare face. But it costs you facial acting, and you should decide that trade now rather than when you are looking at a failed render. If your character is masked, you cannot use shock, a smirk, or a talking-head ending. Every reaction has to be carried by the body instead: a head snap on impact, a hand thrown out, a shoulder turn. That is a real constraint, and it is workable, but only if you design for it from the start. AND THE PART THAT ACTUALLY MATTERS. The sheet alone will not hold your character together. When you write the video prompt, describe the wardrobe again in text. The image reference and the written description do different jobs, and you need both.
Exact prompt
Create a professional character sheet for AI video generation, using the attached photo of me as the face and likeness reference. Keep my facial features recognisable and consistent in every panel.

LAYOUT - a single landscape image on a near-black background (#0D0D0D), divided into clean panels:

TOP LEFT: the character name "[YOUR NAME]" in large white uppercase type, with "CHARACTER SHEET" beneath it in [ACCENT COLOUR].

LEFT COLUMN: one large close-up portrait from the chest up, showing the face and headwear clearly, dramatic soft side lighting against black.

CENTRE PANEL: four full-body turnarounds of the same character standing in an identical relaxed pose, evenly spaced on a mid-grey backdrop, labelled underneath in small white caps: FRONT, 3/4 SIDE, SIDE, BACK. Identical clothing, proportions, colours and lighting in all four.

RIGHT COLUMN, three stacked panels:
- "CHARACTER INFO": NAME, ROLE, PERSONALITY, VIBE as label and value pairs.
- "COLOR PALETTE": five colour swatches with their hex codes printed beside them.
- "ACCESSORIES": the character's headwear, face covering or eyewear, and shoes, floating on black in clean product-shot style.

BOTTOM STRIP: five or six tight detail crops, each labelled in small white caps, showing the distinguishing details of the outfit - for example JACKET PATCH DETAIL, LOGO PATCH DETAIL, SLEEVE DETAIL, HOODIE DETAIL, SHOES DETAIL.

FOOTER: "DATE: [MONTH YEAR]" bottom left, "DESIGN BY: [YOUR NAME]" bottom right.

WARDROBE - keep absolutely identical in every single panel:
[Headwear, and any logo or patch on it]
[Face covering or eyewear, if any]
[Top layer, with colour and hex code]
[Outer layer, and every patch with its exact position]
[Lower garment]
[Footwear]
[Hair]

STYLE: photorealistic, studio lighting, sharp product photography, high detail throughout. Clean typographic labels. No watermarks, no signatures, no extra text beyond the labels described above.
Requirement: This is the only prompt in the guide that goes to an image model. Everything after this goes to a video model.
- Clear front-on photo of your face prepared
- Wardrobe brackets filled in from your Pinterest outfit
- Accent colour hex code included
- Four turnarounds match each other in clothing and proportion
- Sheet saved as your character reference
- Wardrobe also written out as text for the video prompt

4. Choose your references - most of them are your advertising
Understanding what each reference is FOR is the difference between a fun clip and an ad that sells something. CHARACTER. The character sheet you just built. ENVIRONMENT. The location photo from your Pinterest board. Use it for architecture and geography only; you relight it in the prompt. THE HERO OBJECTS. These are not props. Each one gets a full-screen moment. In the video at the top of this guide, that is roughly half the runtime spent looking at nothing but two objects. Choose them deliberately: - One WORN item (glasses, a watch, headphones). This is where your logo goes, and it is also the object the camera can travel THROUGH. A tinted lens filling the frame is one of the best transitions available to you, and it costs nothing but a sentence. - One item with a READABLE FACE (a phone screen, a smartwatch). Screens give you somewhere to put a narrative beat, and they are the one place in the film where you can smuggle in a message. A live call explains why your character wasn't watching where he was going. Go further and make the contact name your call to action. - One item that CARRIES THE PRODUCT. This is what the film is actually for. Everything else exists to get the camera to it. Give it the last three seconds and let it fill the frame. A note on physics: an open drink gives you a liquid arc, which is the most beautiful thing in a slow-motion break. A sealed tumbler gives you a joke instead - nothing spilled, the lid held. Both work. Design around what your object actually is rather than fighting it.
Tip: Put your logo on the WORN object and your product on the LAST object. The worn object gets the best light; the last object gets the longest look.
- Character sheet ready
- Location photo ready
- Worn object identified as the logo carrier and the lens to fly through
- Screen object chosen, with its on-screen message decided
- Product chosen and its physics understood


THE PRODUCT. This is what the whole film is for. Everything else exists to deliver the camera to it.

5. The exact prompt from the video
This is the prompt that produced the film at the top of this page. Copy it, swap the references for yours, run it. The next two steps hold a longer universal template and a 15-second cut. You only ever need one of the three - pick the one that matches what you're making and ignore the rest. HOW THE REFERENCES ARE BOUND. Notice @PERSON, @GLASSES and @DRINK. Rather than trusting slot order, each reference image is given a NAME and then called by that name inside the beats. This is worth doing wherever your model supports it, because it removes the single most common cause of a wrong render - the model attaching the wrong image to the wrong object. Upload your character sheet as PERSON, your eyewear as GLASSES, your product as DRINK, and the prompt below works unchanged. THE MOVE THAT MAKES IT. Read the 7.5-10.0s beat again: the camera glides forward and passes THROUGH the tinted sunglasses lens, the world warms to amber for a beat as the frame rim sweeps past, then racks focus onto the product. That is the shot people are replaying. It costs one sentence, it needs no editing, and almost nobody is asking for it. ONE HONEST NOTE ON TIMING. This prompt asks for 10 seconds. The render came back at 15, because the model stretched the final macro rather than dropping beats. That is the good failure mode - the tail is the most forgiving part of the structure. Write your beats tightly and let the model breathe at the end.
Exact prompt
A single continuous 10-second cinematic shot, summer afternoon, sunlit European city street with pastel neoclassical facades, wide empty road on the left, stone-paved sidewalk.

SUBJECT: the person from @PERSON - identical face and full outfit preserved exactly.
PROP A: he wears the sunglasses from @GLASSES - identical frame shape, metal colour, lens tint.
PROP B: he carries the drink from @DRINK - identical can, label artwork and liquid colour.

0.0-2.0s - Extreme low angle, camera 15cm off the ground, dollying BACKWARD at walking pace, framed tight on his shoes striding toward lens on grey paving stones. Shallow depth of field.

2.0-4.5s - Without a cut, the camera continues retreating while craning upward and tilting up: pants, torso, then his upper body and face. He is mid-call, phone at his ear, drink in the other hand, sunglasses on, walking straight at the lens with a confident unbothered expression.

4.5-5.5s - A man in a beige linen suit walks into frame from the right and their shoulders collide. His head snaps, momentum breaks.

5.5-7.5s - SLOW MOTION begins and deepens. The sunglasses lift off his face and tumble toward the lens; the can slips from his fingers and rotates in the air; the liquid spills out the top and a rope of pink lemonade arcs out in suspended droplets. He is soft-focus behind it, arm still raised with the phone.

7.5-10.0s - EXTREME slow motion, near-frozen. The camera glides forward and passes THROUGH the tinted sunglasses lens - the world warms to amber for a beat as the frame rim sweeps past - then racks focus onto the tumbling can, ending on a macro hold on the label as lemonade droplets hang mid-air.

STYLE: shot on 35mm anamorphic, warm golden grade, creamy bokeh, natural sunlight with hard shadows, high-speed camera realism for the slow-motion half, seamless single take, no cuts. Diegetic street ambience only.
Requirement: Name your references (@PERSON, @GLASSES, @DRINK) instead of relying on upload order. It is the single cheapest fix for the model attaching the wrong image to the wrong object.
- References uploaded and named, not just ordered
- Location and wardrobe swapped for yours
- The lens pass-through beat kept intact
- Product given the final hold


6. The universal template - point it at any product
This is the long-form version: thirty seconds, three separate frozen object beats, a full wide reveal, and a to-camera ending. Use it when you want a film rather than a fifteen-second hook. It is built as seven labelled sections, in this order, because the model reads structure better than it reads storytelling, and because when something goes wrong you will know exactly which section to edit: 1. FORMAT AND CAMERA BODY - aspect, resolution, duration, take count, film stock language. 2. CAMERA BEHAVIOUR - how the camera moves. Explained in step 8. 3. REFERENCE LOCKS - one paragraph per reference, exhaustively described. 4. TIMED BEATS - every beat with a start and end timestamp. The freeze is explained in step 7, the body mechanics in step 9. 5. LIGHTING - time of day, direction, bounce, and a demand for consistency across the take. 6. COLOUR - the palette, and which single colour is allowed to be the most saturated thing in frame. 7. RULES and AVOID - physics constraints, then a blunt list of everything you don't want. Fill in every bracket. The wardrobe description is the one people rush, and it is the one that decides whether your character survives thirty seconds. Write it out in full even though the character sheet is already attached. Most video models cap the prompt around ten thousand characters. This lands close to that ceiling once your brackets are filled, so if you need room, trim LIGHTING and COLOUR first. Never trim the CAMERA section or the AVOID list.
Exact prompt
Vertical 9:16, 1080x1920, 30 seconds, ONE continuous take, no cuts. Photorealistic live-action. [CAMERA BODY] with [LENS SET], [WIDE FOCAL] wide and [MACRO FOCAL] macro. [TIME OF DAY].

CAMERA - CONTROLLED HANDHELD, SUBJECT ALWAYS IN FRAME. The camera is handheld by an experienced documentary operator with a steady grip. It carries a constant fine tremor and a gentle breathing drift so it never feels robotic, and it bobs softly with the operator's footsteps while walking backward - but every move is SMALL, SMOOTH AND CONTROLLED. Absolutely no whip pans, no violent swings, no sudden jerks, no fast camera flicks, no smeared motion-blur transitions. THE MAIN SUBJECT MUST REMAIN VISIBLE INSIDE THE FRAME IN EVERY SINGLE FRAME OF THE FILM FROM FIRST TO LAST. The camera never swings off them, never loses them, never leaves them behind, never shows an empty location without them, and never lets them exit the edge of frame. If they move, the camera follows calmly and keeps them composed in shot. Natural 180-degree motion blur. Shallow depth of field.

CHARACTER LOCK <<<image_1>>>: [exhaustive wardrobe, every garment and patch and its position, hex colours].

ENVIRONMENT <<<image_2>>>: [the location - list the buildings, signage, street furniture, planting, ground surface]. Use for architecture and geography only; relight per the LIGHTING block.

WORN OBJECT <<<image_3>>>: worn by the subject. [material, shape, colour, finish]. On [specific surface, e.g. the outer temple arm], [your existing mark], and IMMEDIATELY RIGHT of it, engraved in the same [metal/colour], sharp and fully legible: [YOUR WORDMARK]. Same tone and engraving depth. Fine luxury engraving, not a print or sticker.

SCREEN OBJECT <<<image_4>>>: held in [which hand / at which ear]. [device description and case colour with hex]. Screen on, showing [the narrative beat - a call, a message, a timer].

SURVIVOR OBJECT <<<image_5>>>: in [which hand]. [material, colour, closure, artwork]. [State whether it is sealed and whether anything can spill].

0.0-3.0s - THE WALK, REAL SPEED. Full speed, no slow motion. Camera at ankle height, operator walking backward in a crouch, frame bobbing gently. The gait is anatomically correct at natural pace, about two steps per second: HEEL STRIKES FIRST, the foot rolls through the arch, the heel lifts, the toe pushes off. Full stride, real ground clearance, real distance covered. No shuffling, no gliding, no skating feet. Hips sway, weight transfers over each planted leg.

3.0-5.5s - THE RISE. The operator lifts the camera by hand up the body in an uneven, wobbly climb, not a smooth crane, settling chest-up on the face. The subject is mid-[activity] and does not look at camera.

5.5-7.2s - APPROACH. [The second person] hurries the other way, arms full of [scatterable material], not watching where they are going.

7.2-8.3s - IMPACT. They collide shoulder-first, hard. The camera reacts with a small firm jolt and immediately recovers - it does NOT swing away and does NOT lose the subject. [Scatterable material] erupts. All three hero objects separate visibly from the subject on believable arcs.

8.3-10.0s - A REAL FALL, NOT A STUNT. Knocked backward off balance. NOT a somersault, NOT a backward roll, NOT legs flipping over the head, no acrobatics. One staggering half-step back, the trailing foot failing to find the ground, the torso tipping past recovery, one arm swinging back on reflex. Clumsy, heavy, unglamorous. Motion decelerates through this beat.

10.0-10.8s - TIME STOPS. Deceleration to ABSOLUTE ZERO. Not slow motion - a total stop.

10.8-13.4s - FROZEN, WORN OBJECT. The entire world is perfectly static - every person and object at absolute standstill, zero movement, zero drift, zero descent, zero rotation. The subject's pose is identical at the start and end of this beat. ONLY THE CAMERA MOVES. Macro push toward the suspended [worn object]. CRITICAL: it DOES NOT ROTATE OR TURN during this beat; it holds one fixed orientation with the engraved surface facing the lens the whole time, so [your wordmark] stays square to camera and readable. A hard mirror-bright specular glint travels slowly across the surface, lighting each letter in sequence and blooming into a soft flare.

13.4-15.8s - FROZEN, SCREEN OBJECT. Still absolutely static, zero motion and zero rotation. Camera arcs gently through the frozen field and finds it: tilted, face to lens, screen legible. A glint sweeps the edge as the camera passes.

15.8-18.2s - FROZEN, SURVIVOR OBJECT. Still absolutely static, zero motion and zero rotation. Camera arcs on to it, [orientation], a halo of motionless [droplets/particles] around it. Artwork square to camera.

18.2-19.8s - THE REVEAL. Camera pulls back and rises smoothly into a wide of the whole frozen tableau. The subject stays centred in frame.

19.8-21.2s - SNAP BACK AND LAND, FULLY ON SCREEN. Full speed returns in one instant and gravity acts IMMEDIATELY. No hovering, no floating, no hanging horizontally, no gliding. THE LANDING ITSELF MUST BE SHOWN CLEARLY ON SCREEN with the whole body inside the frame and in focus. The camera holds through the entire impact and does not cut away or lose them. No roll, no flip: forearm and hip strike first, then shoulder blade, then back. One small heavy secondary bounce, then settle.

21.2-25.0s - AFTERMATH, ALIVE NOT FROZEN. Low angle at ground level. They lie still but are clearly a living body, never a mannequin: chest rising and falling, head rolling to one side, one knee drawing up, fingers flexing. [Scatterable material] keeps settling for several seconds. Their hand gropes out of frame, finds the [survivor object], pulls it in and raises it - intact, nothing lost. One slow approving nod.

25.0-27.5s - SITTING UP. They push onto one elbow, then sit, unhurried and unbothered.

27.5-30.0s - TO CAMERA, SQUARE TO THE LENS. They TURN THEIR WHOLE UPPER BODY AND HEAD TO FACE THE CAMERA DIRECTLY - front on, square to the lens, NOT in profile, NOT looking off to the side. They lift the [survivor object] a few inches toward camera and hold it, and hold the look, centred and steady, for the last two full seconds. Clean negative space across the upper third.

LIGHTING. [Time of day], CONSISTENT FROM FIRST FRAME TO LAST - sun angle and warmth must not change during the take. [Key direction], [shadow character], [rim light]. [What bounces fill into the shadows and what colour it is].

COLOUR. [Overall palette], deep blacks with retained detail, one warm accent - [YOUR BRAND COLOUR + HEX] - which must be the most saturated thing in any frame it appears in. Everything else desaturated. Filmic rolloff, halation on the speculars, fine 35mm grain.

RULES. The main subject is visible in frame in every frame. All three objects originate on the body and separate visibly at impact; nothing appears from off-screen, teleports or duplicates. During the frozen beats objects are anchored with absolutely zero motion and zero rotation; only the camera moves, and never touches the lens. One take, no cuts.

AVOID. Whip pans, fast camera swings, sudden jerks, smeared motion-blur camera moves, the camera losing the subject, any frame without the main subject in it, an empty location shot. The landing happening off screen. Hovering, floating or levitating; a body hanging horizontally in the air. Backward somersault, backward roll, legs over the head, acrobatics. Slow motion instead of a freeze; objects drifting or rotating during the freeze. Lying motionless like a mannequin. Ending in profile or facing away. Changing sun angle mid-shot. Text overlays, captions, watermarks, UI graphics. Extra limbs, warped hands, morphing or duplicated objects, crowds looking at the lens.
Tip: Use this one when you want the full film. Use the prompt in step 5 when you want the hook.
- Every bracket filled in
- Wardrobe written out in full, not summarised
- All references attached in the right slots
- Prompt still under your model's character cap
7. The 15-second cut
Same architecture, compressed. Use this when your model caps at fifteen seconds, when credits are tight, or when you want a hook rather than a film. WHAT CHANGED, and why: - The walk and the hero reveal are MERGED into one rising move. You still get the real gait, just less of it. - ONE frozen macro instead of three. The worn object keeps its beat because that is where your logo lives. The other objects still separate visibly at impact and hang in the background of the macro, softly out of focus, so the explosion still reads as several things flying. - The wide reveal is one second, enough to register the scale. WHAT DID NOT CHANGE: controlled handheld, subject in frame in every frame, a true zero-velocity freeze with rotation forbidden, a real fall, the landing on screen, and the square-to-lens ending. Those are the parts that took several generations to learn. Compressing the film does not make any of them optional. One consequence worth knowing: at fifteen seconds the single macro is proportionally much longer than any of the three in the long version. That plays well. One long confident look at a product beats three rushed ones, and it is arguably the better ad.
Exact prompt
Vertical 9:16, 1080x1920, 15 seconds, ONE continuous take, no cuts. Photorealistic live-action. [CAMERA BODY] with [LENS SET], [WIDE FOCAL] wide and [MACRO FOCAL] macro. [TIME OF DAY].

CAMERA - CONTROLLED HANDHELD, SUBJECT ALWAYS IN FRAME. The camera is handheld by an experienced documentary operator with a steady grip. It carries a constant fine tremor and a gentle breathing drift so it never feels robotic, and it bobs softly with the operator's footsteps while walking backward - but every move is SMALL, SMOOTH AND CONTROLLED. Absolutely no whip pans, no violent swings, no sudden jerks, no smeared motion-blur transitions. THE MAIN SUBJECT MUST REMAIN VISIBLE INSIDE THE FRAME IN EVERY SINGLE FRAME FROM FIRST TO LAST. The camera never swings off them, never loses them, never shows an empty location without them. Natural 180-degree motion blur. Shallow depth of field.

CHARACTER LOCK <<<image_1>>>: [exhaustive wardrobe, every garment and patch and its position, hex colours].

ENVIRONMENT <<<image_2>>>: [the location - buildings, signage, street furniture, planting, ground surface]. Use for architecture and geography only; relight per the LIGHTING block.

WORN OBJECT <<<image_3>>>: worn by the subject. [material, shape, colour, finish]. On [specific surface, e.g. the outer temple arm], [your existing mark], and IMMEDIATELY RIGHT of it, engraved in the same [metal/colour], sharp and fully legible: [YOUR WORDMARK]. Same tone and engraving depth. Fine luxury engraving, not a print or sticker.

SCREEN OBJECT <<<image_4>>>: held in [which hand / at which ear]. [device description and case colour with hex]. Screen on, showing [the narrative beat - a call, a message, a timer].

SURVIVOR OBJECT <<<image_5>>>: in [which hand]. [material, colour, closure, artwork]. [State whether it is sealed and whether anything can spill].

0.0-3.0s - WALK AND RISE, REAL SPEED. Full speed, no slow motion. Open at ankle height, operator walking backward in a crouch, frame bobbing gently. The gait is anatomically correct at natural pace, about two steps per second: HEEL STRIKES FIRST, the foot rolls through the arch, the heel lifts, the toe pushes off. Full stride, real ground clearance, real distance covered. No shuffling, no gliding, no skating feet. Across the same unbroken move the operator lifts the camera by hand up the body - an uneven, wobbly climb, not a smooth crane - settling chest-up on the face with the [screen object] at their ear and the [survivor object] in the other hand. They do not look at camera.

3.0-4.2s - IMPACT. [The second person] hurries the other way, arms full of [scatterable material], not watching where they are going, and collides shoulder-first, hard. The camera reacts with a small firm jolt and immediately recovers - it does NOT swing away and does NOT lose the subject. [Scatterable material] erupts. All three hero objects separate visibly from the subject on believable arcs.

4.2-5.5s - A REAL FALL, NOT A STUNT. Knocked backward off balance. NOT a somersault, NOT a backward roll, NOT legs flipping over the head, no acrobatics. One staggering half-step back, the trailing foot failing to find the ground, the torso tipping past recovery, one arm swinging back on reflex. Clumsy, heavy, unglamorous. Motion decelerates hard through this beat.

5.5-6.0s - TIME STOPS. Deceleration to ABSOLUTE ZERO. Not slow motion - a total stop.

6.0-9.0s - FROZEN, WORN OBJECT. The entire world is perfectly static - every person and object at absolute standstill, zero movement, zero drift, zero descent, zero rotation. The subject's pose is identical at the start and end of this beat. ONLY THE CAMERA MOVES. Macro push toward the suspended [worn object]. CRITICAL: it DOES NOT ROTATE OR TURN during this beat; it holds one fixed orientation with the engraved surface facing the lens the whole time, so [your wordmark] stays square to camera and readable. A hard mirror-bright specular glint travels slowly across the surface, lighting each letter in sequence and blooming into a soft flare. The [screen object] and [survivor object] hang motionless and softly out of focus in the background.

9.0-10.0s - THE REVEAL. Still absolutely static. Camera pulls back and rises smoothly into a wide of the whole frozen tableau: the subject tipped backward above the ground, [scatterable material] hanging in the air, the second person frozen mid-stumble, all three objects fixed in space. The subject stays centred in frame.

10.0-11.2s - SNAP BACK AND LAND, FULLY ON SCREEN. Full speed returns in one instant and gravity acts IMMEDIATELY. No hovering, no floating, no hanging horizontally, no gliding. THE LANDING ITSELF MUST BE SHOWN CLEARLY ON SCREEN with the whole body inside the frame and in focus. The camera holds through the entire impact and does not cut away or lose them. No roll, no flip: forearm and hip strike first, then shoulder blade, then back. One small heavy secondary bounce, then settle. [Scatterable material] slams and skids, the [survivor object] bounces once and rolls, the other objects clatter down around them.

11.2-13.0s - AFTERMATH, ALIVE NOT FROZEN. Low angle at ground level. They lie still but are clearly a living body, never a mannequin: chest rising and falling, head rolling to one side, fingers flexing. [Scatterable material] keeps settling. Their hand gropes out of frame, finds the [survivor object], pulls it in and raises it - intact, nothing lost.

13.0-15.0s - TO CAMERA, SQUARE TO THE LENS. They push up onto one elbow and TURN THEIR HEAD AND UPPER BODY TO FACE THE CAMERA DIRECTLY - front on, square to the lens, NOT in profile, NOT looking off to the side. They lift the [survivor object] a few inches toward camera and hold it, and hold the look, centred and steady, for the last full second. Clean negative space across the upper third.

LIGHTING. [Time of day], CONSISTENT FROM FIRST FRAME TO LAST - sun angle and warmth must not change during the take. [Key direction], [shadow character], [rim light]. [What bounces fill into the shadows and what colour it is].

COLOUR. [Overall palette], deep blacks with retained detail, one warm accent - [YOUR BRAND COLOUR + HEX] - which must be the most saturated thing in any frame it appears in. Everything else desaturated. Filmic rolloff, halation on the speculars, fine 35mm grain.

RULES. The main subject is visible in frame in every frame. All three objects originate on the body and separate visibly at impact; nothing appears from off-screen, teleports or duplicates. During the frozen beats objects are anchored with absolutely zero motion and zero rotation; only the camera moves, and never touches the lens. One take, no cuts.

AVOID. Whip pans, fast camera swings, sudden jerks, smeared motion-blur camera moves, the camera losing the subject, any frame without the main subject in it, an empty location shot. The landing happening off screen. Hovering, floating or levitating; a body hanging horizontally in the air. Backward somersault, backward roll, legs over the head, acrobatics. Slow motion instead of a freeze; objects drifting or rotating during the freeze. Lying motionless like a mannequin. Ending in profile or facing away. Changing sun angle mid-shot. Text overlays, captions, watermarks, UI graphics. Extra limbs, warped hands, morphing or duplicated objects, crowds looking at the lens.
Tip: 7,349 characters before you fill the brackets, so it has real headroom under most models' caps. The 30-second version does not.
- Every bracket filled in
- One hero object chosen for the single macro
- Landing still on screen
- Ending still square to the lens
8. Why the freeze section is written that way
This is the most common failure and the one that separates a convincing bullet-time shot from a mushy slow-motion one. When you ask a model to 'slow down dramatically' or 'enter bullet time', it will almost always give you continuous slow motion, the subject keeps descending, everything just moves slowly. That reads as a video playing at 20% speed. It does not read as time stopping. A real freeze has three properties, and all three are written into the prompts above: 1. VELOCITY IS ZERO, not low. The prompt says 'absolute zero' and 'a total stop' and 'not slow motion' in the same breath, because any one of those alone gets ignored. 2. THE POSE IS IDENTICAL at the start and end of the beat. Stating this explicitly gives you something testable later. 3. ONLY THE CAMERA MOVES. Everything else is anchored in world space. There is a fourth constraint that is easy to forget, and it is in the prompts too: NO ROTATION. If you ask an object to hold still but don't forbid rotation, it will slowly turn, and if it turns, your logo rotates away from the lens exactly when the camera arrives to look at it. That single omission can cost you an entire generation. Note that the prompt in step 5 deliberately does NOT use a hard freeze - it uses deepening slow motion into 'near-frozen'. That is a valid choice and it suits a liquid arc, which looks better moving very slowly than stopped dead. Pick the one that suits your product.
Warning: Test it afterwards: pull the first and last frame of each frozen beat and flip between them. If anything moved, the freeze did not take.
- 'Absolute zero' and 'not slow motion' both present
- Pose declared identical at start and end of beat
- Rotation explicitly forbidden on every frozen object
- Only the camera is permitted to move
9. Why the camera section is written that way
AI camera work has a signature you can measure. Pull frames at native frame rate and track how much the image shifts between them. On a typical generation you'll find the frame is completely static for a third to a half of all frames, with a slow drift and no oscillation. A real handheld walking shot bobs rhythmically with the operator's footsteps, roughly twice a second. That flat motion signature is what people mean when they say a clip 'looks AI'. So you ask for handheld. Here is the trap, and it is worth knowing before it costs you a generation. If you ask forcefully for shake, tremor and jolts, the model does not distribute that energy evenly across the take. It saves it up and spends it all in one place, usually a violent whip pan at the most dramatic moment. The result is worse than what you started with: the walk stays locked and glidey, and then the camera swings so hard at the climax that it loses the subject completely and the payoff happens off-screen. That is why the CAMERA section is worded the way it is: - It describes the OPERATOR, not the shake. 'An experienced documentary operator with a steady grip' produces better results than 'shaky handheld camera'. - It says every move is small, smooth and controlled. - Then it states the hard rule: the subject must be visible in every single frame, first to last. That rule is repeated in the RULES section and again in AVOID, deliberately. Three times is not redundancy here; it is what makes it stick. The prompt in step 5 takes a different route to the same place - it specifies a dolly and a crane rather than handheld, which is inherently controlled. If your film is a product piece rather than a documentary moment, that is the cleaner choice.
Warning: Asking for more shake can make the camera smoother and the climax broken. Ask for a steadier operator and a hard in-frame rule instead.
10. Why the body mechanics are spelled out
Two body failures will give you away instantly, and both are named in the negative inside the prompts. THE SHUFFLE WALK. Step through the opening at 0.2 second intervals and watch one shoe. The failure looks like this: the foot lands flat, lifts flat, the stride is tiny, and the character barely covers ground, a shuffle-glide rather than a walk. Real walking is heel strike, roll through the arch, heel lift, toe off. That sequence is written out explicitly, along with a pace ('about two steps per second') and a demand for real ground clearance and real distance covered. THE SOMERSAULT FALL. Ask a model for a dramatic backward fall and it will frequently give you a gymnastic backward roll, legs flipping up and over the head. It looks choreographed, and choreography is the opposite of what this shot needs. Nobody who gets bumped in the street performs a stunt. So the prompt describes the real biomechanics instead, in order: one staggering half-step backward trying to catch balance, the trailing foot failing to find the ground, the torso tipping past the point of recovery, an arm swinging back on pure reflex, knees buckling. Then the landing sequence: forearm and hip first, then shoulder blade, then back, with one small heavy secondary bounce. Notice that the prompt in step 5 sidesteps this entirely. It never lets the character hit the ground - the collision only breaks his momentum, and the camera leaves him for the objects. That is the safest possible route through the hardest beat in the format, and it is worth copying if falls keep coming back wrong.
Tip: The words 'clumsy, heavy, unglamorous' are doing real work in the fall description. Graceful is the enemy here.
- Heel-toe roll spelled out with a pace
- Somersault and backward roll named in the negatives
- Landing order specified (forearm, hip, shoulder, back)
- Or the fall avoided entirely, as in step 5
11. Generate, then inspect it frame by frame
Watching your render at full speed will not tell you what is wrong with it. Every one of the five failure modes is invisible at 24 frames a second and obvious the moment you pull stills. Build yourself a QA pass and run it on every generation before you commit to an edit. STEP ONE - pull one frame per second and lay them out as a contact sheet. This confirms your beat structure landed and shows you immediately if a beat is missing or has drifted. STEP TWO - go dense on the problem areas. Pull frames every 0.2 seconds across the walk, the impact and the landing. This is where shuffling gaits, somersaults, levitation and camera breaks become visible. STEP THREE - verify the freeze. Extract the first and last frame of each frozen beat and compare them. If the subject moved or the object rotated, the freeze did not take. STEP FOUR - check subject presence. Step through the impact sequence and confirm the character is in every frame. A whip pan that hides the landing is easy to miss and fatal to the shot. STEP FIVE - inspect the branding at full resolution. Crop into the macro beats at 100% and read the logo. Do not assume it rendered. The commands below cover the whole pass. If you're on a Mac without ffmpeg, you can do the same thing with Python's AVFoundation bindings via PyObjC, AVAssetImageGenerator with the preferred track transform applied, which matters for vertical video or your frames come out rotated.
Code
# 1. Beat check - one frame per second
ffmpeg -i render.mp4 -vf fps=1 beats/f_%03d.png

# 2. Dense pass on the walk, the impact and the landing
ffmpeg -i render.mp4 -ss 0 -t 3 -vf fps=5 walk/w_%03d.png
ffmpeg -i render.mp4 -ss 4 -t 4 -vf fps=5 impact/f_%03d.png

# 3. Freeze check - first and last frame of a frozen beat
ffmpeg -i render.mp4 -ss 6.0 -frames:v 1 freeze_start.png
ffmpeg -i render.mp4 -ss 9.0 -frames:v 1 freeze_end.png

# 4. Any hidden cuts or whip pans? Spikes mark them.
ffmpeg -i render.mp4 -vf "select='gt(scene,0.3)',showinfo" -f null - 2>&1 | grep showinfo

# 5. Read the branding at full resolution
ffmpeg -i render.mp4 -ss 7.0 -frames:v 1 -vf "crop=iw:ih/3:0:ih/3,scale=iw*2:ih*2" logo_check.png
Tip: Keep your failed generations. Comparing a broken take against a good one at the same timestamp teaches you more about the model than any amount of prompt theory.
- Contact sheet reviewed for beat structure
- Walk checked at 0.2s intervals
- Freeze verified by comparing first and last frames
- Subject confirmed present through the impact
- Logo inspected at 100% crop


12. Put your brand on the object - and finish it in post
Here is the honest limitation, and planning around it will save you a lot of wasted generations. Video models render simple gold shapes beautifully. Ask for three small starburst marks engraved on a temple arm and you will get them, crisp, catching the light exactly as you asked. Ask for a wordmark next to them and there is a good chance you get nothing at all, no text, just bare material, or a garbled approximation. Non-ASCII characters make it considerably worse. Symbols like a Greek letter, a superscript numeral or a trademark mark are the ones models mangle most reliably. So split the job: LET THE MODEL DO THE LIGHT AND THE GLASS. Keep the specular sweep. Keep the lens pass-through. A hard mirror-bright glint travelling across an object, and a camera flying through a tinted lens so the world warms for a beat, both render extremely well and neither can be faked convincingly in post. That is what the model is for. DO THE TYPOGRAPHY YOURSELF. Build your wordmark as a transparent PNG. Sample the metal directly out of your own render so it matches exactly - pull the pixel values off whatever mark DID render successfully, and use that as your gradient. Add a soft dark offset below the letters and a light catch above them so it reads as engraved into the material rather than pasted on top. Then track it onto the object in your editor, set it to follow the surface, and let the glint that is already in your footage wash across it. The result is indistinguishable from a rendered engraving, and it is correct every single time. Keep the wordmark in the prompt anyway. It costs nothing and it occasionally lands. Just do not spend generations chasing it.
Warning: Sample your metal colour from the render itself rather than from your brand guide. The grade has already shifted it, and a swatch that matches your logo file will look wrong sitting on the footage.
- Wordmark built as a transparent PNG at high resolution
- Colour sampled from the actual render, not the brand guide
- Engraved depth simulated with an offset shadow and highlight
- Tracked to the object surface in post
- In-camera glint and lens pass-through left untouched

13. Write the caption and close the loop
The video is the hook. The caption is the conversion. The format that works on this kind of post has four parts and takes about forty words: 1. ACKNOWLEDGE THE TREND. People already recognise the effect. Saying so out loud is honest and it earns attention rather than pretending you invented it. 2. NAME THE SURPRISE. The interesting claim is not 'I made a cool video', it's 'this is one generation, not eight clips'. Lead with whatever is genuinely counterintuitive about your method. 3. PROMISE SPECIFIC VALUE. Not 'link in bio', 'the complete prompt and the five failure modes'. Specificity is what makes someone act. 4. ONE KEYWORD, TIED TO THE VIDEO. Ask for a single word that appears in the film itself, so nobody has to remember an arbitrary token. Then wire that keyword into your comment-to-DM automation so the guide delivers itself. One detail worth getting right: put the ask in the final seconds of the video as well as in the caption. A viewer who watched to the end is the one most likely to comment, and they should not have to go looking for the instruction. And make sure the thing you're promising actually exists and is live before you post. The fastest way to burn a viral moment is to send a few thousand people to a page that isn't there yet.
Tip: Pick a keyword that is a physical object in your video. It is easier to remember, easier to spell, and it makes the comment feel like part of the joke.
- Caption names the trend honestly
- The counterintuitive claim is in the first two lines
- Value promise is specific, not vague
- Keyword appears in the video itself
- Automation tested before posting
- Destination page is live
💡 Pro Tip: Always bind your references by name (e.g., @PERSON, @GLASSES) rather than relying on slot order. This prevents the model from attaching the wrong image to the wrong object, saving you countless reruns.
Key Takeaways
- Seedance 2.5 generates native 30-second videos, eliminating stitching and visual inconsistencies.
- Detailed prompt engineering with timestamps is essential for precise control over actions, camera, and transitions.
- Pre-production (Pinterest mood boards, character sheets) ensures visual consistency and strong branding.
- Explicitly define 'zero velocity' and 'no rotation' in your prompt for a convincing bullet-time freeze.
- Combine AI's strengths (light, glass) with manual post-production (typography) for a polished final product.
Related on Tech4SSD 🔗
- Seedance 2.5: Put Yourself Into the Viral Motion-Transfer Trend (2026)
- How to Recreate Motion-Transfer Videos With Seedance 2.5, No Higgsfield Required (2026)
- invideo MCP: Edit Real Video Timelines by Chatting With Your AI Agent (2024)
📩 Want the freshest AI trends every week?
Subscribe to Tech4SSD — practical AI tools and trends, explained for everyone. Free. Subscribe →
Advertisement
Frequently Asked Questions
What is the biggest advantage of Seedance 2.5 for ad creation?
The biggest advantage is its ability to generate native 30-second videos in a single pass. This eliminates the need for stitching multiple clips, ensuring seamless transitions and consistent visuals, which is crucial for professional ad content.
How do I ensure my character stays consistent throughout the video?
Create a detailed character sheet using an image model (like ChatGPT) that includes multiple angles, a color palette, and accessories. Upload this as a reference (e.g., @PERSON) and explicitly call it out in your prompt for consistency.
Can I put my brand logo directly into the AI-generated video?
Yes, Seedance 2.5 supports direct text rendering. However, for crisp typography, it's often best to let the AI handle the complex lighting and reflections on your product, and then overlay your logo as a transparent PNG in post-production for maximum clarity and control.
What's the key to a realistic bullet-time freeze, not just slow motion?
You must explicitly instruct the model that velocity is 'absolute zero,' 'a total stop,' and 'not slow motion.' Also, specify that the pose remains identical throughout the frozen beat, only the camera moves, and absolutely no rotation of objects occurs.
Final Word
Luma's Seedance 2.5 isn't just another AI tool; it's a powerful director's assistant that puts unprecedented control in your hands. By understanding its capabilities and mastering advanced prompting techniques, you can move beyond simple clips and generate complex, cinematic content like those viral bullet-time ads, all in a single, seamless output.
This is your chance to create stunning, high-impact visuals that truly stand out, reducing your post-production headache and amplifying your creative vision. Go forth and direct your masterpiece! 🎬
Sources & Further Reading
- Seedance 2.5 Prompting Guide | Luma
- Seedance 2.5 Complete Guide | Luma
- Seedance 2.5 Production Workflows | Luma
- Seedance 2.5: How To Think In Scenes | Luma
- Seedance 2.5: Now Live in Luma
- Advanced Seedance 2.0 Workflows | Luma
- How to Prompt Seedance 2.0 | Luma
- Video generation | Luma Agents
- https://lumalabs.ai/learning-hub/dream-machine-how-to-generate-with-ray2
- Seedance 2.0 Basics | Luma
AI tools and features change fast — verify current options before relying on them. — Tech4SSD Editorial
Discussion
Have a question or something to add?
Join the discussion on Blogger